Saturday, 7 October 2023

Get extra cashback for every purchase you make from any site

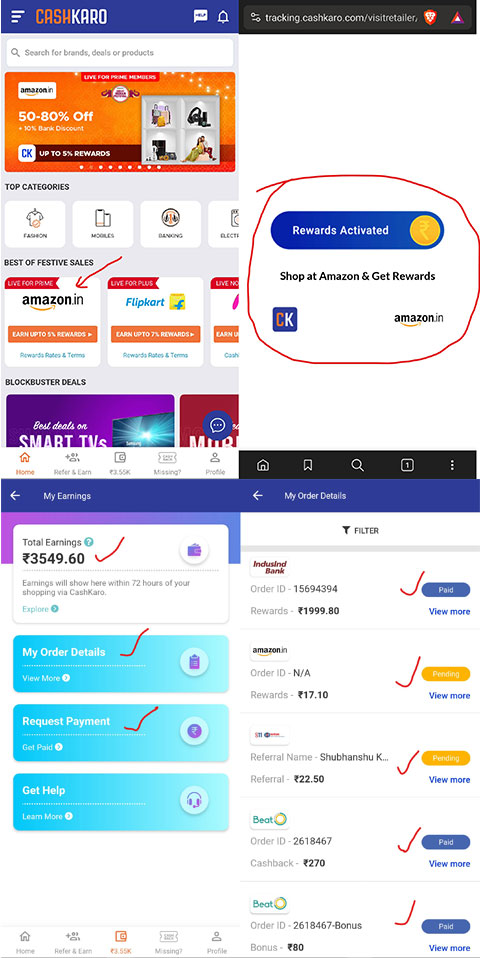
cashkaro cashback
When it comes to buy electronics accessories, clothing, groceries or any other daily use items, we all prefer shopping online and spend a good amount to buy these things. Sometimes, we get good cashback offers through E commerce websites such as Amazon and Flipkart. But this is very rare and mostly we get good deals and cashbacks during their special sale events.

But what if I say that you can get cashbacks on most of the purchases you make and that cashback amount can be transferred into your bank account? Sounds like a bluff, right? But it is actually true and you would not only get great cashbacks, but great deals on products as well. All of this is possible because of "CashKaro" app, which offers you good cashbacks on every purchase you make. And the best thing is, the company is funded by several trusted names among which, Mr. Ratan Tata is also one name. So let's see how to get started with CashKaro and earn cashbacks on every purchase you make.

  1. Install CashKaro app through this link: Install CashKaro
  2. Once the application is installed, open the app and sign up for an account.
  3. After you are signed up, login to the app and that's it. You are done with the initial setup.
  4. Now everytime you want to buy something from Amazon, Flipkart, Myntra etc, just open CashKaro app and look for the banner for the website from where you want to buy your products.
  5. Once you find the banner, click on it and CashKaro will enable cashback tracking and you would be redirected to the shopping app you want to use (such as Amazon) and then you can shop whatever you want and relax.
  6. In 2 to 3 days, your cashback for the purchase you made would be tracked and added in CashKaro app. Once the cashback is tracked, it would be confirmed within a month (if you don't cancel or return your purchased item)
  7. Keep using CashKaro everytime you want to buy something and your cashbacks would be tracked and added in CashKaro app.
  8. Once your cashback is confirmed, you can request for payout and get the cashback money in your bank account through UPI or IMPS transfer, or in the form of Amazon or Flipkart GV. Money is credited instantly after you make the request.

CashKaro cashback app

Isn't it so cool? So don't wait and install CashKaro using the link shared above and enjoy shopping. Keep visiting PC Tricks Guru for more tips and tricks.

Share:

Saturday, 31 December 2022

Get rewards and cashback on every credit card bill payment

In the previous article, I told you about getting free credit card without any income proof. In this article, we would know how to get rewards and cashback for every credit card bill payment.

Usually you would get reward points for any transaction would would make using your credit card. The more you spend, the more reward points you would get. But when it comes to pay the credit card bill, there are no rewards given for bill payments. But there is an option using which you can pay your credit card bills safely and can earn cashbacks and other rewards. Let's see how to do it:

  1. Install Cred app using this link to be eligible to get additional Rs.250 cashback on your first card bill payment.
  2. After the app is installed, open the app and sign up using your mobile number and email ID.
  3. After signing up, add your credit card details in the cred app and you should be able to see the banner for cashback in the rewards section of the app.
  4. Now click on Pay option in Cards section and then pay your credit card bill.
  5. Once the bill payment is done, you would get the option to claim cashback.
  6. Play the game and get assured cashback upto Rs.250
  7. On every bill payment of Rs.1000 or more, you would get assured cashback that can be used again to pay your credit card bills, or recharge your phone or pay other utility bills.

Keep visiting for more tips and tricks. 

Share:

Get credit card without any salary slip or income proof (India)

Get credit card without any salary slip or income proof (India)
Credit cards can be a life saver in the need of urgent money. There are several banks who offer credit cards to the employed people or business owners. But when it comes to students, no one issues a credit card to them because they don't have any income source or business.

In this article, I would let you know the easiest way to get a credit card without showing any income proof or business details. You can get a good credit limit as well which you can use to spend online. You would be able to get a virtual credit card and a physical metal credit card absolutely without paying any charges. Also, there would not be any annual fee for the card as well. All these features in a credit card would be very useful for students.

Requirements to apply for a free credit card without any income proof

  1. PAN Card
  2. ID Proof such as Adhar card
  3. Android mobile

Steps to apply for your card and activate it instantly

  1. First of all, install OneCard app using this link: Click Here (Make sure to install the app from the link I have shared to get Amazon voucher of Rs.2000 as welcome gift)
  2. After the application is installed, launch it and fill the details such as your name and phone number to sign up.
  3. During the sign up process, app would ask you to enter your PAN card number to check your credit history. Based on the credit history of your PAN, you would be given credit limit to use with your card.
  4. After you would be done with the sign up, you would be asked for KYC completion. For KYC, you may get online KYC option (if you already have any existing credit card issued on your name) or app would ask you to schedule a physical KYC verification at your address.
  5. You may select your address where you would like to complete the document verification for KYC and schedule an appointment. Once the appointment is scheduled, you would see the KYC status after launching the app.
  6. On the scheduled date, OneCard KYC executive would visit your location and after document verification, you will get a notification through SMS in a few hours.
  7. After you would receive the notification, you can open the OneCard app and then complete the activation of your OneCard. Once activated, you would be able to use your card online to make transactions on your favorite website.
  8. A physical metal card would be sent at your address in 7 to 10 days. You can use this card in restaurants, gas stations or any place where credit cards are accepted for making payments.
This card is awesome and for every spend, you would earn reward points as well which can be converted into money and can be used to shop online. So apply for OneCard using this link now and keep visiting PC Tricks Guru for more tips and tricks.
Check out this post to know more about earning cashback on credit card bill payments.

Share:

Wednesday, 14 December 2022

Earn money by reviewing software products

Earn money by reviewing software products
Earning money online is not an easy task and most of the sites in this category are either fake or the rate of earning is very slow. In this article, I would share two websites with you which are genuine and you can earn money online just by reviewing software products on these sites. The software products which you use in your Office or at home, are the ones in which you get expertise and have a good experience in working on those software. So, on these websites, you can just sign up using your LinkedIn account and review the software of your choice. Once the review is approved, they would send your reward through email which can be used to redeem Amazon, Flipkart, Croma or any other e-commerce website or retail store.

1. TrustRadius

TrustRadius is a platform where you can find a huge list of software to review. Before writing your review you need to make sure to sign up (use this link) on the platform using your LinkedIn account. Make sure to keep your linkedin account updated with your educational and work details. It would increase the chances of review approval.

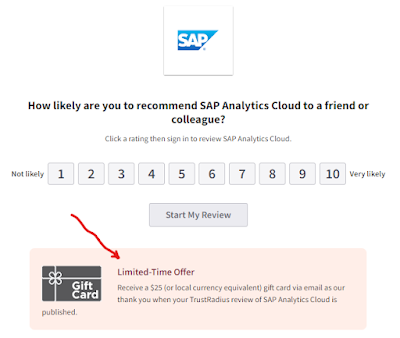
Once you are done with your profile update, look for any software to review. The software would have a banner related to the reward on the review page.

trustradius reward banner

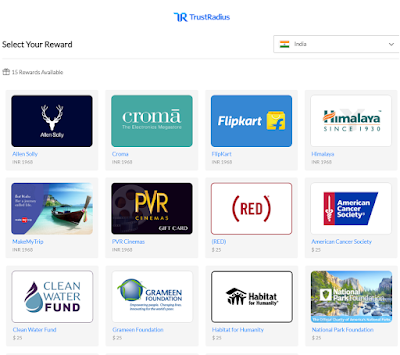
Once you are done with the review, you would have to wait for about 10 days. In 10 days, review would be approved and you would receive your $25 gift on your email. The email would contain a link through which you can redeem those $25 for your favorite shopping voucher.

choice of vouchers to redeem

After you redeem your reward, you would see a page instantly with your voucher code and PIN. I redeemed Croma reward using which I can buy any electronics gadget from Croma.

reward earned by reviewing software

>Click Here To Start Your Review and Earn $25

2. G2: Business Software and Services Reviews

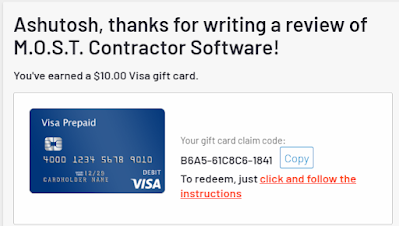
This website is also same as TrustRadius. To be able to use this site, you need to sign up using your linkedin account on https://www.g2.com/ and then start reviewing the software products which you use. After the review is submitted, it would be checked by the moderation team and once it is approved, you would receive a virtual VISA card of $5 or $10 or $25, depending on the reward which would be offered for your review. Once you receive your reward, you can use it on any website which accepts international card and do online shopping.

G2 reward history

visa reward card received for software review

Keep visiting PC Tricks Guru for more tips and tricks.

Share:

Thursday, 8 September 2022

Fix 100% CPU Utilization in Windows 10/11

Fix 100% CPU Utilization in Windows 10 or 11
While using Windows OS, there are several processes which keep running in the background which use system resources, such as CPU and Memory. These processes cause system slowdown issues if not optimized properly. Usually Windows is smart enough to prioritize critical system processes to make sure that the OS is utilizing the hardware on an optimum level, but sometimes, due to 3rd party applications (such as antiviruses) and malware, some processes start utilizing the CPU at the maximum level and CPU utilization reaches 100% which slows down the overall system performance. In some cases, if the system is overheating or there is any hardware fault in CPU or system Fan, then also this kind of issue appears. I am sharing some of the steps which you can use to fix the issue.

1. Scan and restore corrupted system files using "System File Checker" utility

Before running this utility, make sure to run Deployment Image Servicing and Management (DISM) tool by running this command in elevated cmd window: DISM.exe /Online /Cleanup-image /Restorehealth

DISM uses Windows Update to provide the files that are required to fix corruptions. But if the OS is already broken and most of the components are not working in Windows, this command would not be so helpful.

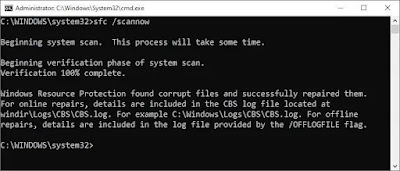
After running the DISM command, in the same elevated command prompt window, run the following command sfc /scannow and press enter key. This command will scan all protected system files, and replace corrupted files with a cached copy that is located in a compressed folder at C:\Windows\System32\dllcache.

running DISM
sfc /scannow

2. Set the process priority to low, if it is utilizing too much CPU resource

Open task manager and check which process is using more CPU. Right click on the process and click on "Go to details" and then it would show up the actual exe file which is creating that process. Simply right click on the exe file name, then click on "Set Priority" and click "Low". This step would ensure that the process would be restricted from using maximum CPU resources.

set process priority to low

3. Install all pending Windows updates

Click on Start and then click on Settings. From there, open Windows updates and check for all the available updates (cumulative, feature updates and other optional updates) and install them. Once the updates are installed, restart the system and check for the CPU utilization.

update windows

4. Install all system drivers (including BIOS and Intel Turbo Boost Driver)

Open your system manufacturer's website and check for the downloads section. From the downloads section, download all the latest drivers for your system. Drivers include BIOS, VGA, Audio, Chipset, Dynamic Tuning Driver, Intel Turbo Boost driver etc. If your manufacturer provides any tool for auto update of drivers (such as HP Support Assistant, Dell Support Assistant, Lenovo Vantage etc), then use the tool to auto update the drivers to the latest version.
But I would personally recommend using IObit Driver Booster tool which checks for the best performing drivers for your device and auto downloads and installs them. I am personally using it and trust me, it is awesome.
Once the drivers are updated, restart the system and check the system performance. Make sure not to miss updating the BIOS to the latest version, because BIOS would usually require manual updation from manufacturer's website.

update drivers

5. Create a high performance power plan

Most of the times, due to balanced power plan of the OS, processor is not utilized properly by the system processes which cause malfunction with the processor and system processes. This causes incorrect CPU utilization. So it is recommended to create a high performance power plan and set it as default so that system could run with its maximum potential. To create a high performance power plan, follow the steps below:
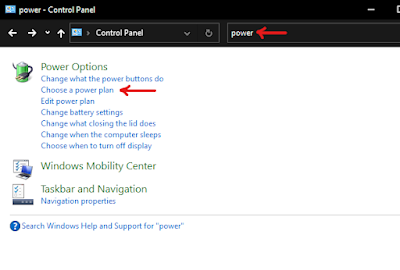
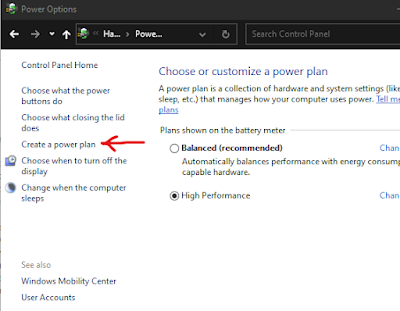
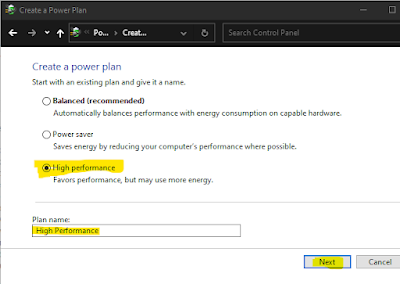
> Open control panel and in the search bar, type power, and then click on "Choose a power plan" and set the power plan to "High Performance". If it is not available in your system, then click on "Create a Power Plan". Now select "High Performance" and type the name of your power plan (you may use any name, I used High Performance) and then click on Next and finish. Once you are done with creating the power plan, use it in power options. It should bring back the CPU utilization to normal.

choose a power plan
create power plan
create high performance power plan

6. Modify settings in registry

Before doing modifications in registry, make sure to take a backup of registry. Once you are done with the registry backup, navigate to this location in registry: HKEY_LOCAL_MACHINE>SYSTEM>CurrentControlSet>Control>Session Manager>Memory Management and double click on "Clear Page File Shutdown" and change the value data to 1 and click OK. Then restart the system and check if the issue still persists.
clear page file in registry

7. Disable P2P Share for Windows Updates

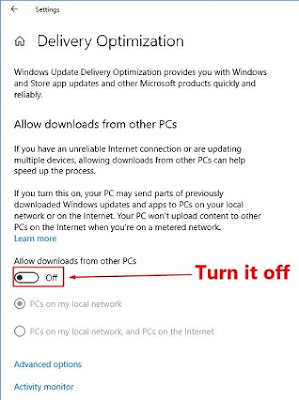
To disable P2P share for Windows update, click on Start, then go to settings and open windows updates. Then click on "Advanced Options", then click on "Delivery Optimization" and then turn off "Allow downloads from other PCs".
disable P2P

8. Uninstall Sophos client or update it to the latest version

It has been observed that Sophos Endpoint client and other Sophos products are also causing 100% CPU utilization issue with several systems. If your system too has any Sophos client installed, try to remove it or update it the latest version and check if it helps. It is a known issue with Sophos and they are expected to fix it with their future updates.

9. Perform clean boot and run a complete virus scan using Malwarebytes anti malware utility

Malware and viruses are also a major reason of the 100% CPU utilization issue. If a computer is affected by any malware, sometimes it exploits the ntoskrnl.exe file, which is Windows NT Kernel and System file. Its process is visible in task manager with the name "System" and it uses maximum amount of CPU. Although, this file is exploited by some 3rd party applications as well which may be installed in the computer. So first of all, try running the system in clean boot mode and check if the issue is resolved. If it is not resolved, run a complete system scan with a good antivirus, such as Malwarebytes antimalware tool. It should fix the issue.
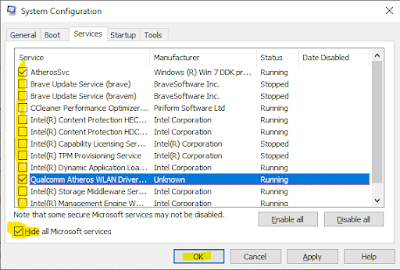
To perform clean boot, open msconfig.exe and then click on "Services". Then click on "Hide all Microsoft services" and then uncheck all the services except LAN, WLAN and Audio services, otherwise your internet would be disconnected and system audio will stop working. Then click on OK and restart your system.
clean boot

10. Factory Reset the OS/Reinstall Windows

If none of the above options worked, reinstall the OS or factory reset the OS and check if it fixes the problem. If it works, then update all the drivers and then install your applications one by one and check if the issue reappears after installing any specific driver or application. If the issue reappears after installing any specific application or driver, that would be the culprit. Uninstall it immediately.

11. Contact system manufacturer for hardware tests and part replacement

If the issue is not resolved even after OS reinstallation, then either system processor or the system fan is faulty which is causing overheating or processor malfunction. In some cases, I have observed that hard drive and memory also caused similar issues due to memory leak. So contact your system manufacturer and ask them to run hardware tests and replace motherboard along with the processor and fan. This would resolve the issue for sure.

Note: In some cases, it is observed that some systems using some specific models of TP Link routers also caused this issue and this was a known issue which is resolved. So if you find any user who has TP Link router which is very old and firmware is outdated, ask them to disconnect from the router and observe if the issue still remains the same.
Additionally, you can use tuneup utilities such as IObit Advanced System Care utility or any other good tuneup utility to optimize your system performance.
Share:

Sunday, 23 January 2022

SwifDoo PDF - An all in one tool to manage your PDF files

SwifDoo PDF
PDF format is one of the most popular format to send documents over emails and the best thing about a PDF file is that is doesn't lose its formatting, no matter on which device you are opening it. But sometimes we need to make some corrections and edit the document which is easier for Word documents, but not for PDF documents because PDF documents are non editable. To edit these documents, you need special tools which cost a lot.

In these situations, SwifDoo PDF comes in handy. This tiny software can do all the tasks, such as editing PDF, splitting a PDF in multiple files, merging PDF, applying watermarks, encrypting and signing the document etc.

Let's know a brief about the features of SwifDoo PDF:

1. View PDF File: SwifDoo PDF can be used as a PDF viewer. It is lightweight and supports all kinds of PDF files. You can make it your default PDF viewer and use it with ease.

2. Add annotation: You can add annotation in your PDF files, highlight text, do text formatting, insert shapes, add stamps and erase the modifications made in the document.

3. Edit PDF files: Want to make some corrections in an existing PDF file or want to add your own text in the same font and color of an exiting file? You can do it easily with SwifDoo PDF. You can insert images, add or delete text, add hyperlinks, change or delete images and use several other editing features.

4. Extract text from a PDF using OCR: SwifDoo PDF has OCR feature in built which can extract text from any scanned PDF to be used later in a text editor.

5. Convert PDF to other formats: You can convert a PDF into Word, Excel, Text, HTML, CAD, Image etc files with a single click.

6. Page management: You can add, merge, delete, extract and split pages within a PDF document with SwifDoo PDF.

7. Security Features: In SwifDoo PDF, you can find the options to E-Sign a PDF, encrypt a PDF for enhanced security, add watermark, compress it and convert the document to scanned document.

All these features are very handy and are very useful for a person who has to deal with files and edit them frequently.

To know more and buy SwifDoo PDF, you can visit https://www.swifdoo.com/

Share:

Wednesday, 6 October 2021

How to upgrade to Windows 11 on unsupported hardware without data loss

Windows 11
Windows 11 has been rolled out officially for all the users as a stable release on 5th Oct 2021. But many users are disappointed because Microsoft is not allowing them to upgrade to Windows 11 if their machines are not with latest hardware. To be able to use Windows 11, the machine should have 8th Gen or above processor, TPM 2.0 and secure boot enabled. Without these requirements, you would not be able to upgrade to Windows 11.

But there is a script that you can use to bypass the system check and easily upgrade to Windows 11 using the official ISO file of Windows 11. Make sure to disable windows defender before running the script otherwise it might not let the script run. Also, there is no harm in running the script and I already have personally tested it. Follow the steps given below to initiate the upgrade process:

1. Download Windows 11 ISO File from Microsoft's website. (https://www.microsoft.com/en-us/software-download/windows11)
2. After downloading the ISO file, download the system check bypass script from this link: Bypass Script Link
3. After downloading the zip file, extract it and run the Skip_TPM_Check_on_Dynamic_Update_v2.cmd file as admin.
4. Once the script is done with the registry modification, open the Windows 10 ISO and run the setup. You would see that it would allow you to install Windows 11, however it would ask you to accept the risks that may state that the system might not get security updates on unsupported hardware. You may click on accept and forget about it, all the updates would be delivered to the device without any issues.
5. Now proceed towards the installation and choose the upgrade option. Windows 11 installation would begin and once it is done, your system would restart and you will be able to login to Windows 11 and use it without any problems.

For more tips, keep visiting PC Tricks Guru.

Share:

Sunday, 8 August 2021

How to turn a website into Windows app

How to turn a website into Windows app
There are so many websites which we visit frequently using our computers and think that if there could be a Windows application for that website, it would have been great. Usually we bookmark the sites in the browser and use them to open the sites but what if I tell you that you can easily turn any website into a Windows application and can access the app right from your start menu or a desktop shortcut? It would really be easy to access your favorite websites without searching them in the bookmarks because you would be able to open them as an app using their own app icon in your start meu.
Following are the steps to do in just in seconds:
  1. Open Edge browser in your Windows 10 computer and open the website which you want to convert into an application.
  2. Now from the top right corner, you need to click on the three dots or press Alt+F keys together to open the browser menu.
  3. Now click on "Apps" in the menu and then click on "Install this site as an app".
  4. A prompt will pop-up on the screen asking you to name the app, just type the name of the app and then press enter.
  5. That's it, you can now access the website as an app from your start menu.
Below is the video demonstration for the whole procedure.

Keep visiting for more tips and tricks.
Share:

Thursday, 24 June 2021

Brave Browser : The Best Browser

Brave Browser : The Best Browser
In our day to day life, web browsers play a very important role which we don't even realize. From surfing internet to watching youtube videos, we use web browsers. Google chrome is the most popular web browser and majority of the internet users use this browser. But you might have heard a lot of complaints that Google Chrome uses maximum resources of the computer and if you open multiple tabs in it, is gets frozen or makes the PC very slow.

To overcome this problem, some companies tried to use the source code of Google Chrome and developed several Chromium based web browsers but they all couldn't do well. Even Microsoft used Chromium source code and enhanced its Edge browser which improved its performance a lot. But still it could not beat the best browser of all time, which is "Brave" browser.

Brave browser is made using chromium source code and in terms of speed and features, it is the best among all browsers. Not only this, you can earn BAT crypto tokens which you can transfer to your crypto wallets and sell it and cash it out. Isn't it cool getting free crypto tokens just by using your web browser for your in your day to day internet usage?

>>>DOWNLOAD BRAVE BROWSER FROM HERE<<<

Following are some of the features of the brave browser:

  • In built adblocker which is very powerful in blocking youtube ads, web ads, search result ads and any kind of ads which may interrupt your web browsing experience.
  • As compared with the other browsers, Brave is 40% faster and it doesn't consume much amount of RAM even if you open multiple tabs.
  • It has very strict privacy features which protect you from being tracked and from malicious cookies.
  • For browsing websites, it rewards you with BAT crypto tokens.
  • You can use all chrome extensions in Brave browser.

I would definitely suggest you to install Brave browser and use it as I am personally using it from long time and it is surprisingly good. With the time, Brave browser keeps getting better and better, thanks to the amazing developer team.

>>>DOWNLOAD BRAVE BROWSER FROM THIS LINK<<<

For more tips and tricks, keep visiting pctricksguru.com

Share:

Saturday, 22 May 2021

Cannot connect to the virtual machine, try to connect again : Fix error with HyperV

Cannot connect to the virtual machine, try to connect again : Fix error with HyperV
If you are a network engineer or an instructor who uses Virtual machine to run several ISOs, you might face issues in creating virtual machine using HyperV in Windows 10. You may get the error "Cannot connect to the virtual machine. Try to connect again. If the problem persists, contact your system administrator. Would you like to try connecting again?"

There are so many suggestions available online which suggest to change the date and time of the system, reinstall HyperV, delete the existing virtual machine and re-setup it, clear the DNS cache of the system etc but none of the would work. This issue is actually because of an old bug in Windows 10 and just a minor change can fix the issue easily. Let me guide you through the steps to easily resolve the problem:

  1. Open cmd with admin and run the command netstat -ano | find "2179" and check if the virtual machine management service is listening to this port, I'm sure you would not get any result after running the command.
    not listening to port
  2. Open HyperV and right click on your virtual machine and click on Turn Off.
  3. Now open registry editor by running regedit command in RUN and then navigate to HKEY_LOCAL_MACHINE\SOFTWARE\Microsoft\Windows NT\CurrentVersion\Virtualization and look for the DWORD "ListenerPort".
  4. Double click on "ListenerPort" and click on "Decimal" and change the value to 21791 and click OK.
    modify registry
  5. Now close registry editor and open PowerShell as administrator.
  6. Type the following commands in powershell to stop and start vmmc service:
    Stop-Service vmms
    Start-Service vmms
  7. Now close powershell and open cmd with admin and run the following command again: netstat -ano | find "21791" and this time, you would see that vmmc is listening to the port number 21791.
    listening to port
  8. Now close cmd and then try connecting to your virtual machine through HyperV, it would get connected and you would be able to run your virtual machine without any errors.
    hyperv connecting

That's all for today. Keep visiting PC Tricks Guru for more tips and tricks.

Share:

Custom Search Box

Earn Money With Crypto

WazirX

Offers and Deals

Blog Archive

Contact Form

Name

Email *

Message *