Thursday, 30 January 2014

How to create USB Recovery Drive for windows 8

How to create USB Recovery Drive for windows 8
Most of the times, when our computer's operating system gets corrupted, we have to reinstall windows. But if we don't have the installation media, then we can use the windows recovery disk to restore the windows operating system in our computer without loosing our data. So, let's see how to create recovery disk for windows 8.

Follow the steps below:

1. Insert your pen drive in your computer's USB port.
2. Now open command prompt with administrative rights (to open command prompt, press win key + R from your keyboard and type cmd and press enter key) and type this command and press enter key:
mkdir c:\RefreshImage
Now again, type the following command and press enter key:
recimg –CreateImage c:\RefreshImage
typing commands to create folders
3. Now, bring your mouse pointer in the right corner of the screen and click SEARCH.
search button
4. Now type RECOVERY in the search box and click SETTINGS category. Now click CREATE A RECOVERY DRIVE from the search results.
searching for recovery tool under settings
5. When the recovery drive tool appears, click the checkbox next to "Copy the recovery partition from the PC to the recovery drive" if you want the recovery tools, such as applications and drivers that came with your PC to be included in the recovery drive. If the selection is grayed out, that means your PC doesn't have a recovery partition. Keep in mind that if you do copy the recovery partition, you'll need at least a 16GB USB flash drive. Without it, you can make it with just 256 MB. Click NEXT to continue.
ready to create recovery drive
5. Now select your drive in which you want to make the recovery drive. My pen drive's letter is F:\, so I'm selecting F:\ drive. You must select your own pen drive according to its drive letter.
selecting drive
6. Now in the next window, click CREATE button.
final step
7. Now the recovery drive creation process will start and it may take about 2 minutes. When the process finishes, click FINISH button.
windows 8 recovery drive creation starts now
windows 8 recovery drive created successfully
8. That's it.Your Windows 8 recovery drive is ready.

If you want to create a recovery CD/DVD instead of USB drive, then follow the steps below:
9. At STEP 5, remove all the pen drives connected with your pc and then uncheck the option "Copy the recovery partition from the PC to the recovery drive" and click NEXT.
uncheck the option "Copy the recovery partition from the PC to the recovery drive" and click NEXT
10. Now click CREATE A SYSTEM REPAIR DISC WITH A CD OR DVD INSTEAD.
click CREATE A SYSTEM REPAIR DISC WITH A CD OR DVD INSTEAD
11. Now select your CD/DVD Writer Drive and insert a blank CD/DVD in it and then click CREATE DISC.
select cd/dvd writer and insert a blank disc
12. Now, disc creation will be started.
disc creation starts now
13. When finished, a dialog box will appear, click CLOSE.
label your disc
14. Now click OK.
windows 8 recovery disc creation completed
That's it. We have created our Windows 8 Recovery Disc also. The same procedure will be followed with Windows 8.1 also.
Share:

Sunday, 26 January 2014

Install Android 4.3 Jelly Bean In PC

Install Android 4.3 Jelly Bean In PC
Android is a very popular mobile operating system, but do you know you can install it in your computer also. Well, I'm going to tell you how to install android OS in a computer.

Follow the instructions below:

1. First of all, download Oracle VM VirtualBox from here and Android x86 4.3 ISO file from here.
2. Install VirtualBox in your computer and run it.
3. Select NEW. A Dialog box will appear, Enter the name you wish for your OS and select Type as LINUX and version as OTHER LINUX and click NEXT.
4. Now choose the amount of RAM you would like for your virtual machine. Use at least 1GB for this step.
5. In the next step, select CREATE A VIRTUAL HARD DRIVE NOW and click CREATE button.
6. Now in the next step, select VDI and click NEXT.
7. Now set storage space for your OS as per your requirements and click CREATE button. I recommend 8 GB.
8. Now your virtual machine is set. All you need to do is add the location of the Android 4.3 image file. Click on  the settings button in virtualbox. Under the settings navigate to storage, below the storage tree select empty and click on the disk image and select "choose a virtual CD/DVD disk file" and select the android 4.3 image. Check the Live CD/DVD box and click OK.
choosing android image file for virtualbox
9. Double click on your virtual machine to start it and click OK for all the dialog boxes. Select Install Android-X86 to hard disk and click OK for all the dialog boxes.
start android iso
boot from android iso
10. Now after starting the ISO file, we need to create a partition for the Android OS. Don't worry, it will not harm your windows OS. Select CREATE/MODIFY PARTITIONS and click OK.
partition creation
11. In the next windows select new > primary and then specify the size of the new partition .
specify size of partition
partition
12. Your new partition has been created. Select WRITE and press enter and type "YES" and press enter again when prompted. In the next window select quit and press enter.
write
partition created successfully
13. Now a new window will appear. Here, select the Sda1 and press enter. Select the ext3 file system and press enter. When prompted to install grub loader select YES. Select NO when prompted to make your system directory as read-write.
14. Now Android OS is installed in your virtual machine. Select RUN ANDROID -X86 and press enter. Click OK if any prompts appear. Then you will see your android loading screen.
run android
15. Now you will see your welcome screen. Fill the required details and you will see the home screen.
android welcome screen

android home screen on computer

android menu in computer

android settings in computer
16. To remove android OS from your virtualbox, just right click on the ISO file and click REMOVE.
removing android

NOTE: You might need to enable virtualization in your computers BIOS. You can enable it from your PC’s BIOS as shown below.
BIOS Settings
Enjoy.
Share:

Bypass Waiting Time Of Websites To Download Files Quickly

Bypass Waiting Time Of Websites To Download Files Quickly
There are so many websites which offer file upload for free. You can sign up for the sites and start uploading your files free of cost. But when you share your file links with your friends, they have to wait for some time before downloading the files. It wastes the time of your friends and they feel lazy to download your files.
I have a trick to bypass the waiting time of these websites and download the files instantly. You can do it by using a chrome extension. Simply, add this chrome extension in your google chrome browser and enjoy downloading files without waiting.
Share:

Friday, 24 January 2014

Unable To See Files In Pen Drive : Fix It

Unable To See Files In Pen Drive : Fix It
Today, I went to the home of my friend and he showed me an 8 GB pen drive which was full of images, documents and movies but after plugging it in computer and opening it, there were nothing in it. Although through properties, I could see that 80% of the pen drive was full and antivirus also was showing that files were being scanned by it, but after opening the drive, it didn't show anything in it. Then I tried to view the files using DIR command in command prompt but there also, it was reported empty. My friend was so worried because it he had stored his college documents and some important photos in it. He asked me to find a solution and get the files back, so I applied a small trick and within 2 minutes, his files came back and were visible in the drive. If you are also facing such type of problem with your pen drive, then use this trick.

Follow the instructions:

1. First of all, scan your pen drive with any good antivirus, such as AVG Antivirus.
2. If no any virus is detected, then open notepad, go to Save As and save the file in the root of the pen drive as autorun.inf and autorun.ini (Suppose your drive is F:, then save the file as F:\autorun.inf and F:\autorun.ini)
3. Now open command prompt and type the following command and press enter key:
attrib -h -r -s /s /d F:\*.* 
4. When command is successfully executed, exit from command prompt and now open the drive of your pen drive. You will see that your files are now visible.
Share:

Some Common Internet Error Codes With Meanings

Some Common Internet Error Codes With Meanings
100 Continue
101 Switching Protocols
102 Processing (WebDAV; RFC 2518)
200 OK
201 Created
202 Accepted
203 Non-Authoritative Information (since HTTP/1.1)
204 No Content
205 Reset Content
206 Partial Content
207 Multi-Status (WebDAV; RFC 4918)
208 Already Reported (WebDAV; RFC 5842)
226 IM Used (RFC 3229)
300 Multiple Choices
301 Moved Permanently
302 Found
303 See Other (since HTTP/1.1)
304 Not Modified
305 Use Proxy (since HTTP/1.1)
306 Switch Proxy
307 Temporary Redirect (since HTTP/1.1)
308 Permanent Redirect (approved as experimental RFC)[12]
400 Bad Request
401 Unauthorized
402 Payment Required
403 Forbidden
404 Not Found
405 Method Not Allowed
406 Not Acceptable
407 Proxy Authentication Required
408 Request Timeout
409 Conflict
410 Gone
411 Length Required
412 Precondition Failed
413 Request Entity Too Large
414 Request-URI Too Long
415 Unsupported Media Type
416 Requested Range Not Satisfiable
417 Expectation Failed
418 I'm a teapot (RFC 2324)
419 Authentication Timeout (not in RFC 2616)
420 Method Failure (Spring Framework)
420 Enhance Your Calm (Twitter)
422 Unprocessable Entity (WebDAV; RFC 4918)
423 Locked (WebDAV; RFC 4918)
424 Failed Dependency (WebDAV; RFC 4918)
424 Method Failure (WebDAV)[14]
425 Unordered Collection (Internet draft)
426 Upgrade Required (RFC 2817)
428 Precondition Required (RFC 6585)
429 Too Many Requests (RFC 6585)
431 Request Header Fields Too Large (RFC 6585)
440 Login Timeout
444 No Response (Nginx)
449 Retry With (Microsoft)
450 Blocked by Windows Parental Controls (Microsoft)
451 Unavailable For Legal Reasons (Internet draft)
451 Redirect (Microsoft)
494 Request Header Too Large (Nginx)
495 Cert Error (Nginx)
496 No Cert (Nginx)
497 HTTP to HTTPS (Nginx)
499 Client Closed Request (Nginx)
500 Internal Server Error
501 Not Implemented
502 Bad Gateway
503 Service Unavailable
504 Gateway Timeout
505 HTTP Version Not Supported
506 Variant Also Negotiates (RFC 2295)
507 Insufficient Storage (WebDAV; RFC 4918)
508 Loop Detected (WebDAV; RFC 5842)
509 Bandwidth Limit Exceeded (Apache bw/limited extension)
510 Not Extended (RFC 2774)
511 Network Authentication Required (RFC 6585)
522 Connection timed out
524 A timeout occurred
598 Network read timeout error (Unknown)
599 Network connect timeout error (Unknown)
Share:

How To Share Your Computer Screen Without Any Software

How To Share Your Computer Screen Without Any Software
Most of the times, when we face some problems in our computer, we have to get it fixed by any tech expert or by any of our geek friend. Usually they use TeamViewer or LogMeIn software to connect to our pc and share our screen to fix the problem. But you have not installed any of these softwares in your computer and want to share your computer screen, I'm going to tell you about a website which allows you to share your screen without any software.

Follow the instructions:

1. Visit http://www.screenleap.com/
2. Now click Share Your Screen Now button.
click the button to connect
3. Now it will ask you to run java plugin, allow it to run.
4. Now it will give you a code. Tell the person who wants to share your screen to go to http://www.screenleap.com/ and enter that code to connect.
code
5. Now after entering the code, the other person can access your desktop and troubleshoot your problem.
6. You can pause or stop screen sharing anytime.
connected now
Enjoy.
Share:

How to check all pending friend requests on facebook

How to check all pending friend requests on facebook
Most of the facebook users send so many friend requests even to unknown person also. In the sent requests, there may be lots of profiles which are inactive or fake. So, it is necessary to check these un-responded requests and cancel them. But it is hard to remember the names of the people to whom friend requests were sent so you may feel it very difficult to find the pending sent friend requests and cancel them.
There are lots of facebook apps on facebook who offer to check your pending friend requests but 99% of them are fake and steal your personal information. So, I am going to tell you an amazing trick to know your pending friend requests to be accepted and cancel them manually.
Just click this link and you will see the list of unaccepted friend requests.
Now you can manually cancel them. Enjoy.
Share:

Thursday, 23 January 2014

Use Your Android Mobile As Wireless Computer Speaker

Use Your Android Mobile As Wireless Computer Speaker
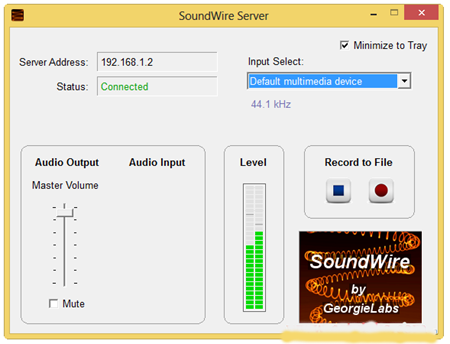
Have you ever thought that your mobile can work as a computer speaker...?? It sounds funny but it may be useful to listen your favorite songs when your speakers stop working due to any problem. Well, it's possible using a small application called "SoundWire". Make sure that your computer and mobile is wifi enabled and are connected together on the same network.

Follow the steps:

1. Download and install SoundWire from here.
2. Now install SoundWire android app in your mobile from google play store.
3. After installing the application in mobile and computer, open it in both the devices.
soundwire pc app
4. The SoundWire desktop application will show an ip address on its screen. Put the same ip address in the mobile app and click connect.
soundwire mobile app
5. That's it. Now play any song in your computer and you will listen it in your mobile.
Share:

Change Battlefield 4 Language From Russian To English

Change Battlefield 4 Language From Russian To English
BattleField 4 is a very popular game these days and is being downloaded by lots of the people from unauthorized sources, like torrentz. Well, after downloading and installing this game, most of them find its default language either Russian or Polish. These languages are not understandable by everyone. So, if you have also got this game and have been facing problems with its language, then I have a great solution to make the game's default language English.

Follow The Instructions Below:

  • Download English Language Pack for battlefield 4 and extract it. (Well, its about 800 mb, but don't worry, just download it and it will surely work for you.)
  • You will get two dll files and one folder in the downloaded file. Copy the two dll files and paste them inside C:\Program Files\Origin Games \BATTLEFIELD 4\
  • If the dll files already exist there, just replace them.
  • Now, from downloaded file, go to Data>Win32 and copy the folder named Loc.
  • Now paste the copied folder into C:\Program Files\Origin Games \BATTLEFIELD 4\Data\Win32.
  • If it asks to replace the exiting folder, click Yes.
  • Now, download this registry tweak and run it to implement it in windows registry.
  • That's all we needed. Your English Language Pack is installed now and set as default language.
Share:

Tuesday, 21 January 2014

How to hide advertisements from uTorrent

How to hide advertisements from uTorrent
While using uTorrent client, you will see some advertisements in the  sidebar and the top of the client window. If you want to remove these advertisements, then I'm going to tell you how to remove ads from uTorrent client.

Follow The Instructions:

1. Open uTorrent.
utorrent advertisements
2. Navigate to Options > Preferences > Advanced.
3. Now Search for upsell and click the string you get and make it "False".
4. Now again search for offers and now you will get so many strings. Make the value of all those strings as "False".
make the string values "FALSE"
5. Now click OK and restart uTorrent. You will see that ads are gone.
Share:

Custom Search Box

Earn Money With Crypto

WazirX

Offers and Deals

Blog Archive

Contact Form

Name

Email *

Message *